by Matthew Brunner, MHS, PA-C, CAQ-Derm
Affiliations: Matthew Brunner is with Elevate-Derm Alliance and Dermatology and Skin Surgery Center in Stockbridge, Georgia.
Funding: Arcutis Corner is supported by Arcutis Biotherapeutics.
Introduction
Presenting a scientific poster is one of the most effective and accessible ways for dermatology physician assistants (PAs) and nurse practitioners (NPs) to contribute to the medical community. Posters allow us to share clinical experience, highlight unique cases, and demonstrate our role as clinician-educators—all without the time and pressure required for a full manuscript or podium presentation. Whether your goal is to establish academic credibility or simply share an interesting case that might help your colleagues in their clinical decision-making, mastering the process of creating a high-quality poster is an essential professional skill.
In a previous column, I highlighted ways to craft a compelling dermatology case report for publication. In this column, I would like to provide some tips for developing a conference-ready dermatology abstract and poster from case selection to final printing, tailored to the way NPs and PAs most often present clinical content.
Note on Poster Formats
While this guide primarily references traditional physical posters displayed at in-person conferences, it is important to distinguish them from ePosters, which are digital versions viewed through online platforms or conference apps.
The instructions, structure, and template in this article apply to both physical posters and ePosters. The same core content and section organization remain consistent; however, elements such as font size, layout, file specifications, and accessibility features should be adjusted for digital screen viewing. Physical posters prioritize large, on-site visuals, while ePosters may include interactive features like hyperlinks or videos.
Conference requirements vary, so always review submission guidelines early, as ePosters often have unique technical specifications (eg, file size limits, accepted formats, and accessibility standards).
Selecting a Strong Topic or Case
The best dermatology posters are built on cases or topics that are clinically meaningful, visually compelling, and educationally valuable. Strong poster candidates include:
- Rare diseases or unexpected presentations
- Novel or off-label therapeutic approaches
- Diagnostic challenges or “clinical pearl” cases
- Adverse reactions to dermatologic therapy
- Quality improvement or workflow innovations in practice
- Patient adherence, education, or counseling strategies
If you are working with images such as clinical photos, dermoscopy, histopathology, or before/after comparisons, you already have one of the most important elements of an eye-catching and memorable dermatology poster: strong visuals. Before proceeding, perform a brief literature search to confirm that your case adds value or offers a new angle (eg, unusual age group, comorbidity, or treatment outcome). This literature search will also be an important component to summarize the background and importance of your contribution in the introduction of the abstract and poster. These references may also be used to summarize your findings or case in the context of the literature in the conclusion.
Ethical and Compliance Requirements
Before drafting an abstract, secure written patient consent for use of any images relevant to the case in publications and scientific presentations. Additional considerations and best practices include:
- De-identify all images and text per Health Insurance Portability and Accountability Act (HIPAA) standards.
- In dermatology, even seemingly nonidentifiable rashes might reveal identity through tattoos, birthmarks, jewelry, or facial structure.
- Remove dates, initials, room numbers, or embedded metadata.
- If your institution requires an Institutional Review Board (IRB) review, obtain it before submission.
- Store consent and documentation in a secure location.
- Most single-patient posters do not require IRB approval, but institutional policies vary. When in doubt, confirm early, as conferences might request proof of compliance. For ePosters, additional digital compliance might apply, such as ensuring files are virus-free, compatible with conference software, and optimized for various devices (eg, mobile vs desktop viewing). Physical posters require physical de-identification checks during printing, while ePosters might need embedded metadata scrubbing tools.
Writing and Submitting the Abstract
- Nearly all conferences require abstract acceptance before a poster can be presented. Poster abstracts are concise (typically 250–350 words) and should clearly state:
- The clinical question or relevance
- What is unique or instructive about the case
- Detailed patient demographics, history, clinical findings, diagnostic workup (eg, biopsy, immunofluorescence), treatment, and outcomes
- Why this matters to practicing clinicians
Conferences such as the Society of Dermatology Physician Associates (SDPA), Society of Dermatology Nurses Practitioners (SDNP), Elevate-Derm Alliance, Maui Derm NP+PA, Georgia Dermatology Physician Assistants (GDPA), and Texas Dermatology Professionals Association (TXDPA), as well as other PA and NP meetings, also use online submission portals with preset word limits, disclosure requirements, and author order listings. Decide author order early to avoid ambiguity later, especially if mentors or collaborating physicians are involved. Submission requirements can differ by format: Physical posters often need specifications for board size (eg, 4 × 8 feet), while ePosters might require upload in specific platforms (eg, via Learning Management Systems) with previews for interactive features. Hybrid conferences might allow both, but ePosters could have deadlines for testing digital functionality.
Structuring the Poster
A conference poster is not a full journal article printed in large format. It is a visual teaching tool designed to be understood in 3 to 5 minutes while a viewer stands in front of it (for physical posters) or scrolls through it digitally (for ePosters). The conference might provide a template or key sections required for inclusion. In general, most dermatology posters follow this structure:
-
- Title—concise, specific, not a full sentence
- Author and affiliation block
- Background/brief introduction (2–3 sentences)
- Case presentation or topic summary
- Clinical images, dermoscopy, histopathology, or graphics
- Discussion—comparison to literature, teaching relevance
- Key learning points—short, bulleted, high-impact
- References—4–8 citations in small font
- Disclosures/acknowledgments (if required)
Differentiation in structure. Physical posters prioritize a linear flow for standing viewers, while ePosters can incorporate nonlinear navigation, such as tabs or hyperlinks to expand sections. Styles for physical posters focus on static, high-contrast visuals; ePosters encourage multimedia integration but must avoid overwhelming digital interfaces.
Poster Layout Example: Classic 3-Column Format
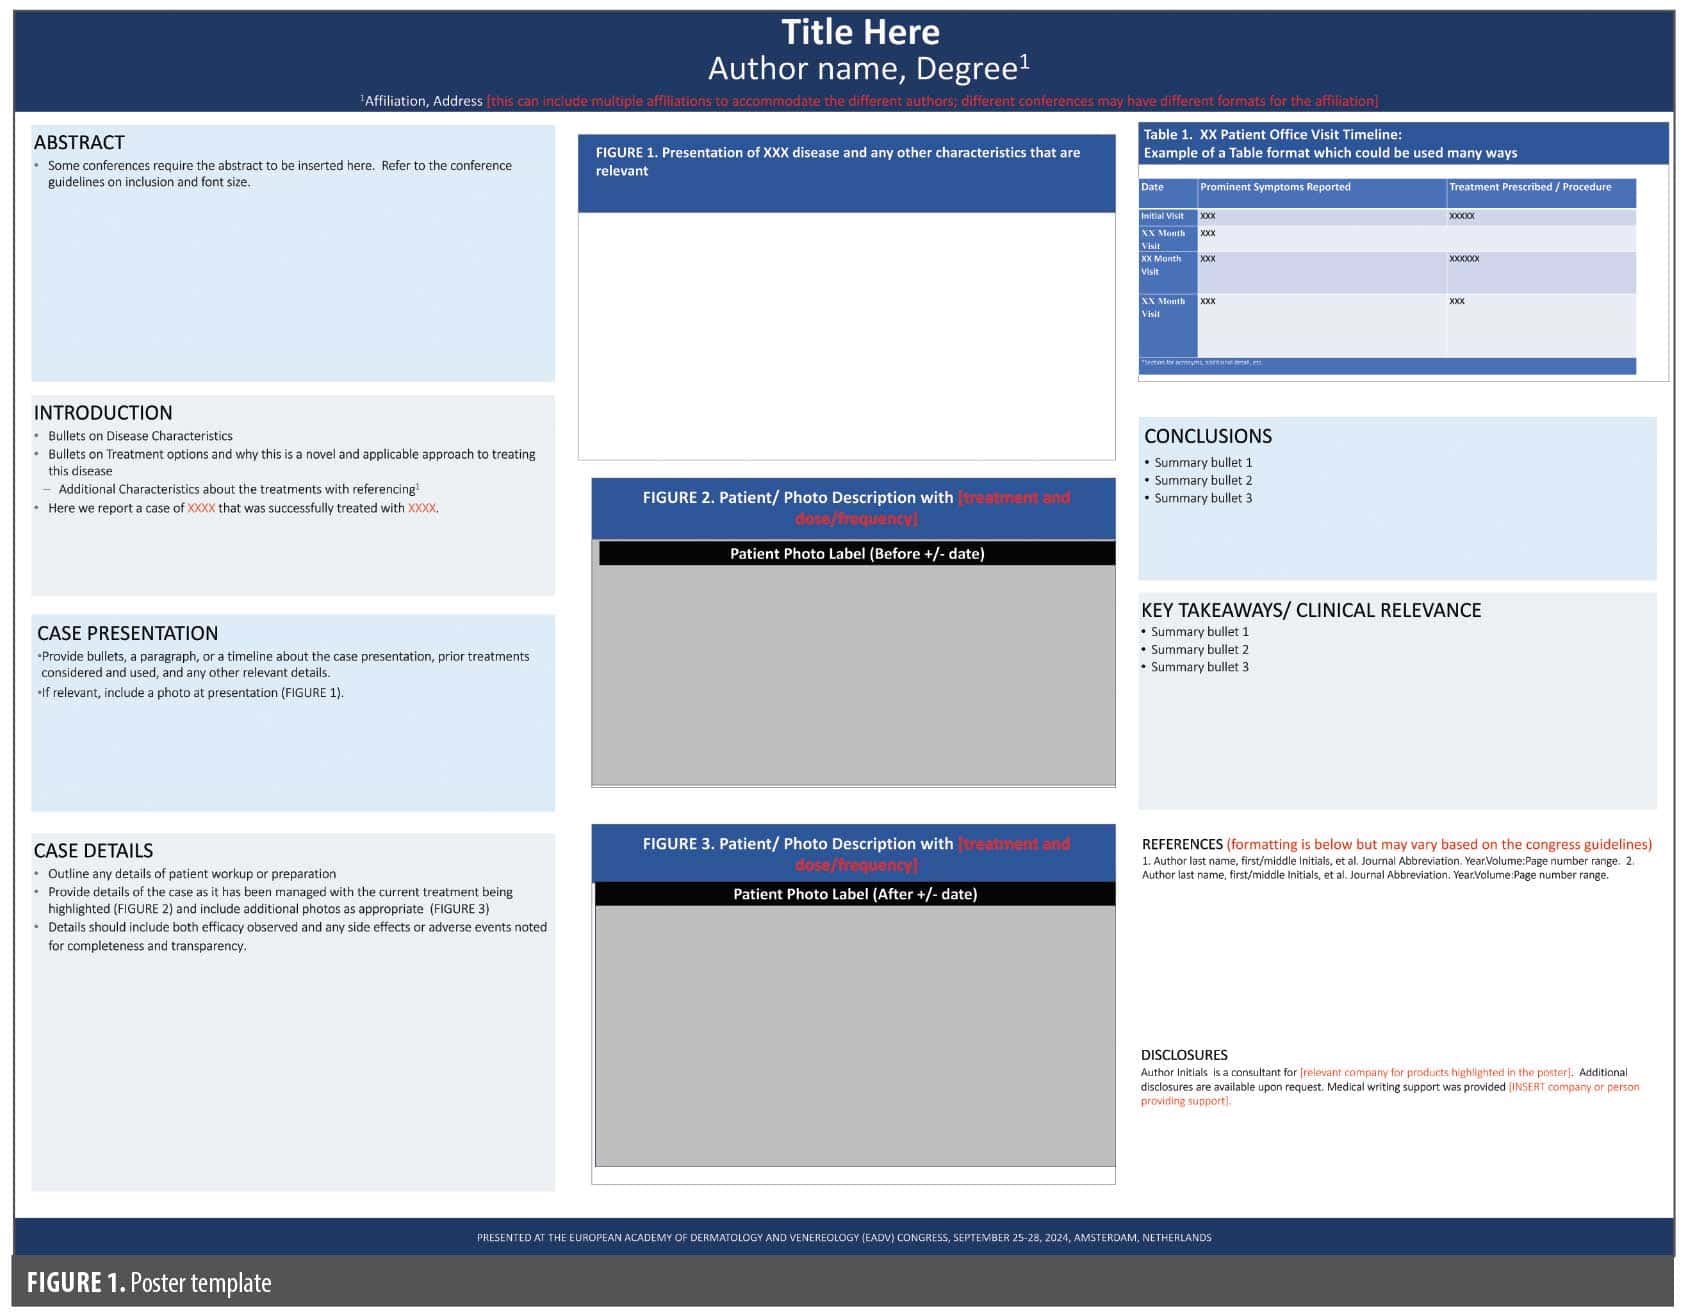
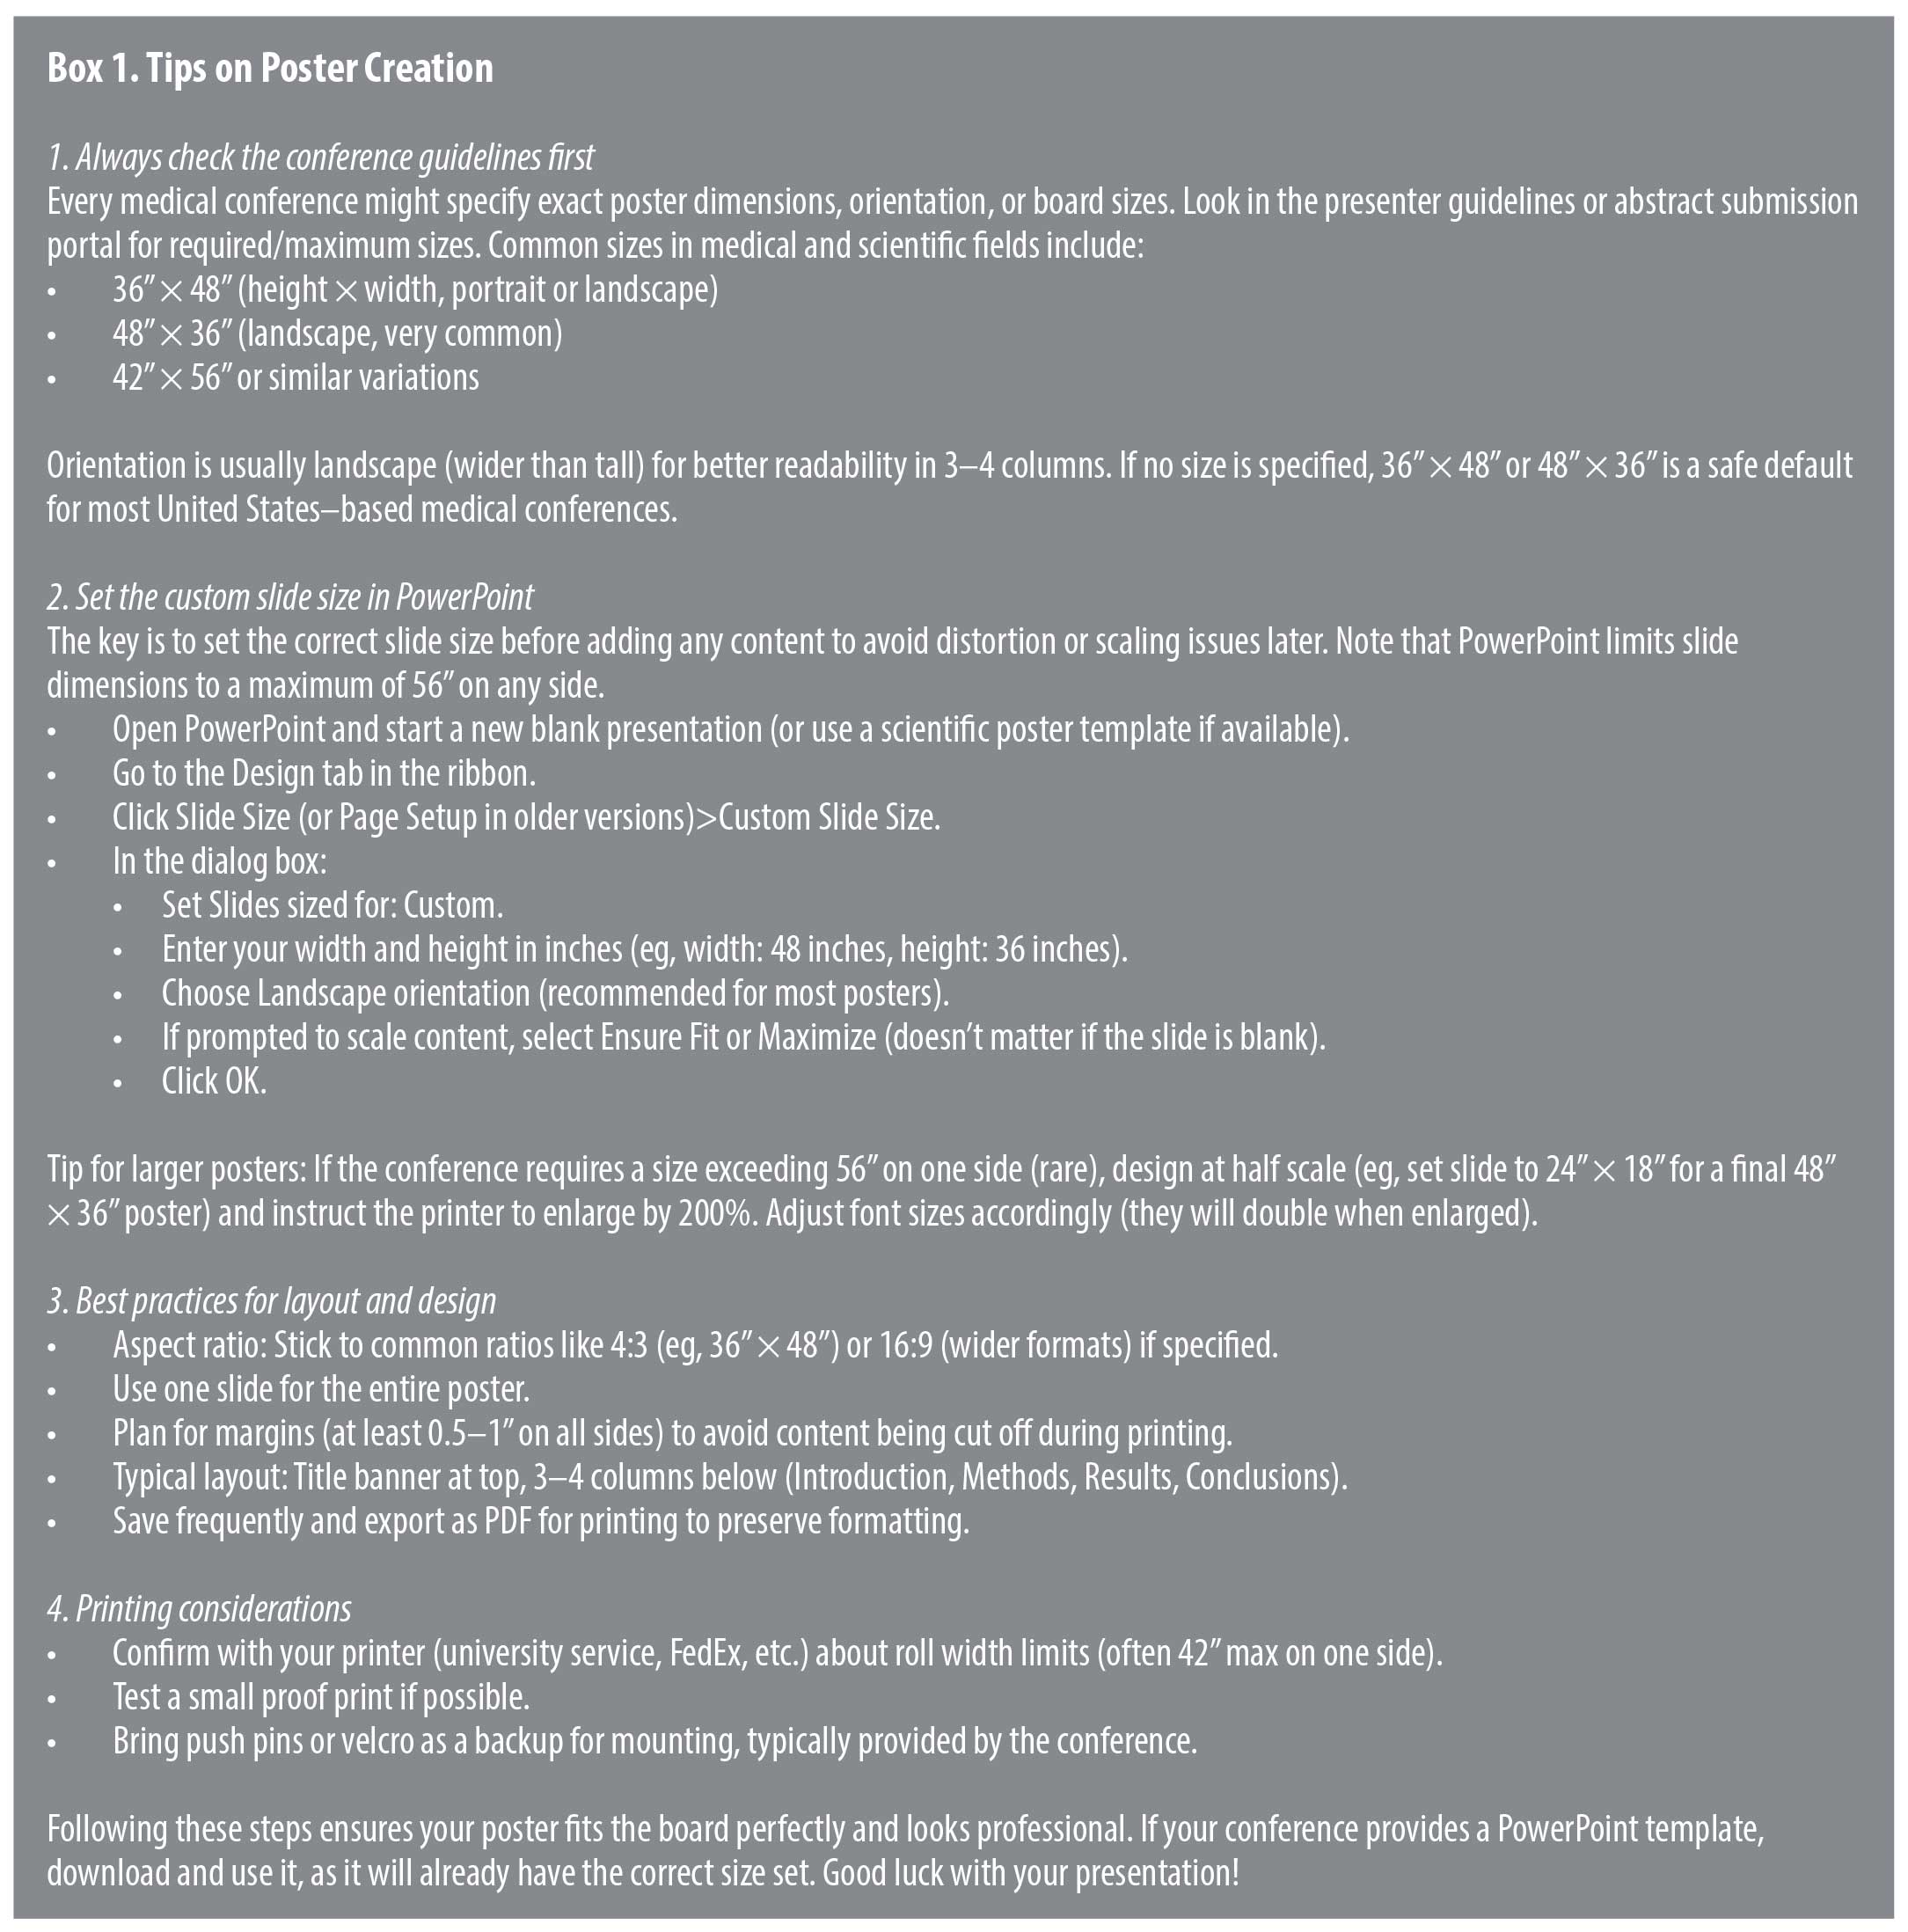
Most dermatology conferences use a horizontal poster board for physical posters, and the standard layout is a 3-column design. The title and author block stretch across the top. Directly underneath, the left column contains the background and case narrative, formatted in short paragraphs or structured bullets. The center column is commonly used for visuals—clinical photos, dermoscopy, histopathology, or graphs. The right column contains the discussion, key takeaways, references, and acknowledgments. Adequate white space separates sections to allow the reader’s eye to flow naturally from left to right (Figure 1). For ePosters, adapt this to a single-page scrollable PDF or interactive slide, where columns might stack vertically for better mobile viewing. Conferences might mandate landscape orientation for physical posters but allow portrait for digital ones to fit screens. See Box 1 for tips on poster creation.
Design and Visual Best Practices
- Because dermatology is such a visual specialty, formatting matters as much as content. Posters should be clean, readable, and image-forward. A template for a landscape version to get you started is provided.
- Recommended formatting standards:
- Title: 80–100 pt (physical); 40–60 pt (ePosters for screen scaling)
- Authors and affiliations: 72–96 pt (physical); adjustable for zoom
- Section headers: 44–56 pt
- Body text, legends, tables and figures: 26–32 pt (ensure legibility on small screens for ePosters)
- Simple, readable fonts (Arial, Calibri, Helvetica)
- Images at 300 dpi (dots per inch) minimum resolution
- Image resolution can be checked by opening the image (typically saved as a .jpg file) and under the “Tools” menu, select “Show Inspector”. It will show the window below to indicate the dpi of the image.
- References: 24 pt
- Use “sentence case” for Titles and Headers; ALL CAPITALS ARE HARD TO READ.
- Short paragraphs or bullets—not long text blocks
- Use consistent color scheme and spacing
- Label every image clearly and sequentially
If the font cannot be read 4 to 6 feet away from the printed poster, it is too small (applies to physical only; for ePosters, test on multiple devices). A crowded poster can be distracting and detract from the information that is being conveyed. Instead, strategic use of white space can make it look more professional and draw the eye to the content. For ePosters, incorporate accessibility features like high-contrast colors for color-blind viewers and screen-reader compatibility, and avoid heavy animations that could slow loading. Physical posters rely on print quality, while ePosters emphasize file optimization to prevent glitches during virtual sessions.
Final Preparation and Printing Checklist
- Abstract accepted and confirmation saved
- Patient consent obtained and documented
- Images verified as de-identified and high resolution
- Poster dimensions and file format confirmed (PDF preferred for both, but ePosters might require interactive PDFs or PowerPoint)
- Co-authors reviewed and approved final version
- Printing scheduled with 1-to-2-week buffer or shipped to conference (physical only); for ePosters, upload and test functionality in advance
- Backup digital copy stored on cloud or flash drive
Awareness of variations. Conference requirements can vary widely—some mandate physical posters for in-person events, others prefer ePosters for virtual or hybrid formats to reduce costs and environmental impact. Check for style guides; physical posters might specify matte vs glossy finishes, while ePosters could require embedding fonts or limiting layers for compatibility.
Common Pitfalls to Avoid
- Overcrowding the poster with text
- No clear “what this teaches” message
- Poor-quality or stretched images
- Small or inconsistent font sizes
- Case that is not meaningfully different from existing literature
- Missing references, disclosures, or consent
- For physical posters, ignoring board size limits; for ePosters, overlooking digital testing (eg, broken links or slow load times)
Key Takeaways
- Posters are an accessible, high-impact way for PAs and NPs to contribute to dermatology scholarship.
- The strongest posters combine clinical relevance, educational value, and high-quality visuals.
- Patient consent and HIPAA compliance must be secured before submission.
- A clean, 3-column layout with clear hierarchy improves readability and professionalism; adapt for physical vs digital formats.
- A well-executed poster can serve as a stepping stone to publication, invited talks, or future research collaboration.
- Always review conference-specific guidelines for physical vs ePoster formats, as they influence everything from design styles (static vs interactive) to submission processes (print shipping vs digital upload), ensuring your work reaches its audience effectively.